Thursday, August 4, 2011
A Mini Facelift
Monday, July 25, 2011
It's been a long time!


Saturday, August 14, 2010
Lobster Punch Art
Pinchy the Punched Lobster
 Here is my Lobster card made entirely out of punches! I really like how this little guy turned out! I used Riding Hood Red card stock and sponged the edges and used a marker in some places. The sentiment is from Sincere Salutations and the lemons are from Tart and Tangy stamped with Daffodil Delight ink. Behind the sentiment I punched black wide ovals for each side and just set them out a little bit from the white one and a 1 3/4" circle for the back. The lobster, "Pinchy", is put on the card with dimensionals to give him some depth.
Here is a labeled picture of what the pieces are and then I have some directions with photos below.
 I took some pictures along the way as I made it so I could explain how.
When I say Wide oval w/ modern label out in the picture above this is what I mean. I punched a wide oval piece and then used the modern label to punch out the pieces to make it look like the claw edge. I just punched them one right next to the other to get the uneven claw look.


This is how I made the small part of the claws. I just cut the wide oval like shown and them punched the edge with the modern label punch again.


When I say Wide oval w/ wide oval out this is what I mean. I just took a chunk off the end of my punched wide oval shape using the wide oval punch.

Word window w/ small oval out for the legs. I then cut these pieces in half the long way so I had skinny legs.

Here is the front half put together. After that its all oval shapes with pieces just taken off the ends.

Hope this was helpful if you want to try and re-create him! My daughter named him "Pinchy" and I think he needs more friends! I thought this would be great for a scrapbook page of eating lobsters or fishing or something like that.
Treat Box Tutorial
I found this great treat box when searching around this afternoon. You can see it here on Sunny Stampin' Inc. but I've also pasted it below. I love the cookie holder idea too (found here)!


This little Easter Treat Box is one that I custom designed. It was inspired by a circle card that we learned how to make at Stampin’ Up!’s Leadership Convention. I started with their basic design and altered it into a 3 dimensional box. You can see a side view of the box below:

Supplies used for this project:
- Stamps: A Good Egg
- Ink: Black Staz On, Basic Black Stampin’ Spot (you could use a Black Stampin’ Write Marker), So Saffron and Pumkin Pie Classic Ink, So Saffron and Going Gray WWC (watercolor wonder crayon)
- Paper: 12" x 12" So Saffron CS, 1 1/2" x 11" piece of Chocolate Chip CS, 1" x 11" piece of Bashful Blue CS, scraps of Whisper White CS and Chocolate Chip CS
- Accessories: 8" piece and a 6" piece of wide chocolate chip grosgrain ribbon, On Board Ginormous Pieces Chipboard – the largest circle was punched out and the "frame" used as a template, corner rounder punch with the guard removed, stamp-a-ma-jig, blender pen, personal paper trimmer with scoring blade, medium cello bag, Stampin’ Dimensionals, paper snips, white Signo Gel Pen, paper crimper, bone folder
You can access the template HERE.
Step-by-Step Directions
Step 1: Align the template with the top corner of the 12" x 12" piece of So Saffron CS. Using a pencil, trace the outline of the circle. The diameter of the circle is aobut 8 1/2" so if you don’t have the template shown below, any circle shape or circle cutter that has a circle of approximately the same size will work. Even if the circle is a tad bit smaller or a tad bit bigger the project will still work.

Step 2: Cut out the circle along the pencil lines. Line it up with your grid paper as shown and using a ruler if necessary, make a pencil line on the left and right sides of the circle at 3" and at 3 1/2" as shown.

Step 3: Line up the pencil marks with the channels on your personal paper trimmer and score all the way across the circle along both the 3" mark and then the 3 1/2" marks.

Step 4: Fold along the 3" score line (using your bone folder) , then line up the fold along the top edge of the personal paper trimmer. You are going to score at: 1 5/8", 2 1/8", 6 3/8" and 6 7/8". **Note: when you are aligning your folded circle, you are NOT lining up the largest part of the circle with these dimensions – you are lining up the very top left corner of the fold.

Step 5: Crease along all the score lines using your bone folder. Your template will look like this:

Step 6: Using your paper snips, cut out the two smaller pieces of the circle, following the innermost (towards the center of the circle) score lines.

Step 7: Flip the circle over. Stamp the small flower stamp all over the back of the circle using So Saffron ink. Color in the center of each small flower using a white signo gel pen.

Step 8: Flip the template back over, fold in the side flaps, add sticky strip along the left and right edges of the bottom flap as shown in the picture.

Step 9: Peel of the backing from the sticky strip and carefully bring up the bottom flap and align and stick onto the side flaps so that the box looks as shown. I found it easier to peel of the backing and stick one side at a time.

Step 10: Take your 1 1/2" x 11" strip of Chocolate Chip CS and score and fold at 1 3/4". Lay this fold over the front right edge of the box, and using your fingers carefully shape the belly band around the creases. Do this one crease at a time by gently pinching the CS over the crease to get an "impression" of the crease. After each crease, remove the belly band, place it onto the grid paper and fully crease as shown in Step 11.

Step 11: Each time you crease the areas that you pinched, make sure that the sides of the CS strip are aligned, this will ensure your crease line is straight.

Step 12: Once you have finished going over step 10 and 11 for each crease, use your corner rounder punch to create a scalloped edge on each side of the CS strip. If you’ve never used your corner rounder to create a scalloped edge click HERE to see a tutorial that was created by Beate Johns.

Step 13: You will be overlapping the ends on the backside of the box. Notice from the picture below, that if you were to do that right now, you would see where the scallops do not quite match up. The next step will help you solve that problem. Before you move on though, take a pencil and make a small mark on the top and bottom right where the flap overlaps. ends.

Step 14: Take your paper snips and cut away the scallops from the bottom flap as shown in the picture.

Step 15: Attach the belly band. As you can see, now when you overlap the flaps, you no longer see the mis-matched scalloped edges. Use your snips to tidy it up a little if you need to.

Step 16: This is what the front of the box now looks like.

Step 17: Take your 1" x 11" strip of Bashful Blue CS, score and fold it at 1 3/4", and then shape it around the box, the same way you did the chocolate chip belly band.

Step 18: Once you’ve creased and folded your belly band so that is fits around the box, remove it and on the longer end, stamp "happy easter" just to the left of the score line. Use your Stamp-a-ma-jig if nessary. Mount the band so that it is centered in the chocolate chip band. This time though, the "seam" where the two ends overlap will end up on the front right side of the box. This seam will be covered by the ribbon.

Step 19: Take some Chocolate Chip CS scraps and run them through a crimper. Using a paper trimmer or the SU table top cutter, cut them into very thin strips. Crunch up the strips and gently rub them between your palms. This will become the filler for your treat box.

Step 20: Tie your 8" piece of ribbon around the Bashful Blue CS strip – position it so that it covers where the ends overlap – and tie in a knot. Stamp, color and cut out your chick and the half egg shell and mount.
Fill your medium cello bag with your treats -remember the box is only 1/2" deep so the treats have to lay relatively flat. Tie the cello bag shut with the 6" piece of ribbon tied ina knot. Place a little tissue on the inside bottom of the box for "padding", insert your treat then stuff a little filler along both sides. You’re done!
For more great projects that you can make at home check out my Stamp Classes by Email, or if you’re a Stampin’ Up! Demonstrator and are looking for great classes to offer your customers, check out my Class Planning Service for Stampin’ Up! Demonstrators.
Tuesday, August 3, 2010
Monocromatic Purple

Wednesday, July 28, 2010
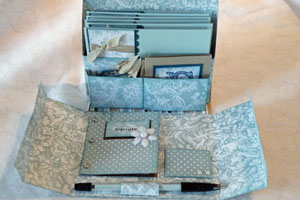
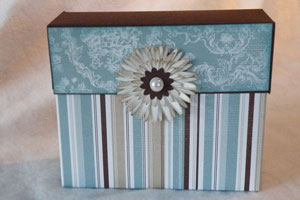
Stationary Box
by Jackie Topa
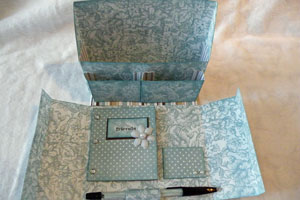
Make a beautiful gift box to hold stationery, notecards, a pen and postage.
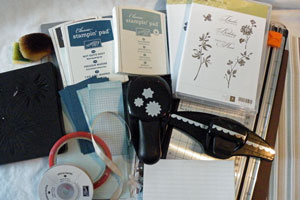
Supplies
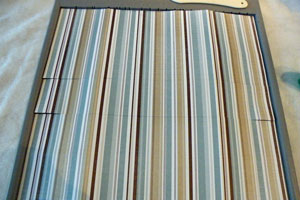
- One 12 "x 12" piece of heavy patterned paper (box base)
- One 8 1/2" x 4 1/4" piece of heavy patterned paper
- One 5 1/2" x 2" piece of heavy patterned paper
- One 4 1/2" x 2" piece of heavy patterned paper
- Six 3 1/2" x 6" pieces of lined paper
- One 6 1/2" x 3 3/4" piece of heavy patterned paper
- One 2" x 3" piece of heavy patterned paper
- One 2" x 1 1/2" piece of heavy patterned paper or cardstock
- One 10 1/8" x 6 1/8" piece of cardstock (lid)
- Two 6" x 1 3/4" pieces of heavy patterned paper
- Two 2" x 1 3/4" pieces of heavy patterned paper
- Hole punch
- Brads
- Pen
- Sticky Strip™ or other strong adhesive
- Scissors
- Scoring tool
Step-by-Step
-
Step 1
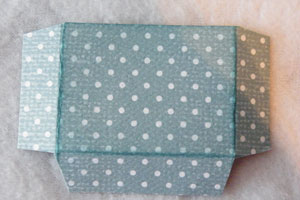
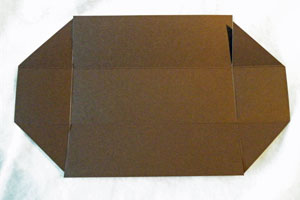
Score the 12" x 12" piece of heavy patterned paper at 5" and 7". Turn paper 90 degrees and score at 3" and 9" in the other direction.
-
Step 2
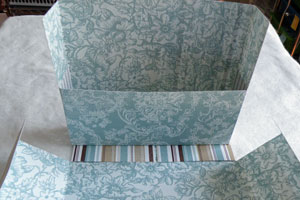
Cut sides to score lines. Fold these cut pieces into the center and glue down for extra support.
This will make the bottom of your card box.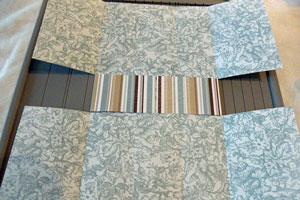
-
Step 3
Cut 1 3/4" off each side of the top panels only. Score the bottom two panels at 1" and 11".

-
Step 4
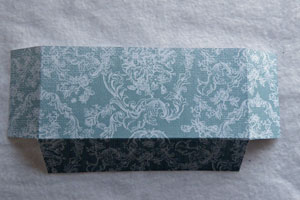
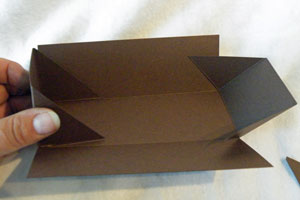
Score both short sides and one of the long sides of the 8 1/2" x 4 1/4" piece of heavy patterned paper at 1 1/4".
-
Step 5
Trim the corners and apply Sticky Strip™ to scored sections.
-
Step 6
Fold up the top of the card box and attach this piece to the box to form a holder for the cards.
-
Step 7 (Optional)
Use a pair of scissors to angle the paper from the top corner of the card box to the top corner of the card pocket.
-
Step 8
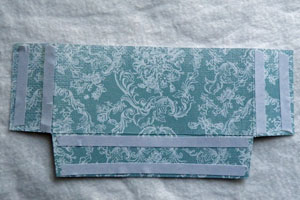
Score the 5 1/2" x 2"and the 4 1/2" x 2" pieces of cardstock at 1/2" and 1" from each end. Apply Sticky Strip™ along the score lines of the outer sections and to one of the inner sections as shown.
-
Step 9
Attach the pockets to the front of the card holder.
-
Step 10
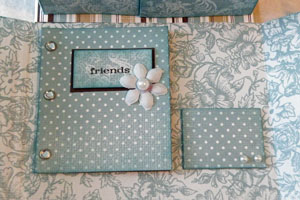
To make the address book, cut some lined paper to 3 1/2" x 6". Six pieces were used here, but the book can be any thickness.
Score the 6 1/2" x 3 3/4" piece of heavy patterned paper at 3 1/4" and 3 3/4" . Fold in half, insert the lined paper, punch three holes and insert brads.
-
Step 11
Embellish the address book and glue it to the bottom half of the card box, leaving enough room for the pen and stamp envelope.
-
Step 12
Score the 2" x 3" piece of heavy patterned paper at 1/2" on both short sides and one long side. Trim corners and fold scored pieces under.
-
Step 13
Embellish the stamp envelope as desired and glue it down beside the address book.
-
Step 14
Wrap the 2" x 1 1/2" piece of cardstock or patterned paper loosely around pen making a loop. Center the pen and then attach the loop to the stationery box.
-
Step 15
Decorate the pen to match the stationery box by inserting a piece of patterned paper into the barrel of an RSVP® pen or adhere a piece to the outside of the pen.
-
Step 16
Score the 10 1/8" x 6 1/8" piece of cardstock at 2” on all sides. Cut the vertical score line up to the horizontal score line and trim the corners.
-
Step 17
Fold the ends up to form the lid and glue in place or use Sticky Strip™.
-
Step 18
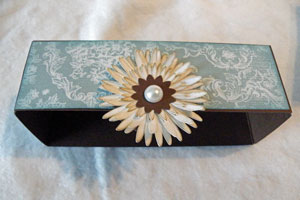
Glue the two 6" x 1 3/4" and 2" x 1 3/4" pieces of heavy patterned paper to the lid and make an embellishment for the center.
-
Step 19
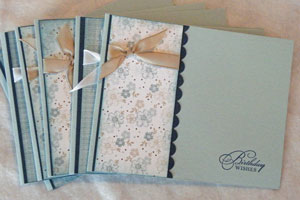
Make some cards to fill up the card box.
-
Step 20
Make some 3” x 3” note cards.
-
Step 21
Make some tags.
-
Step 22
The finished stationery box.